Vegetables
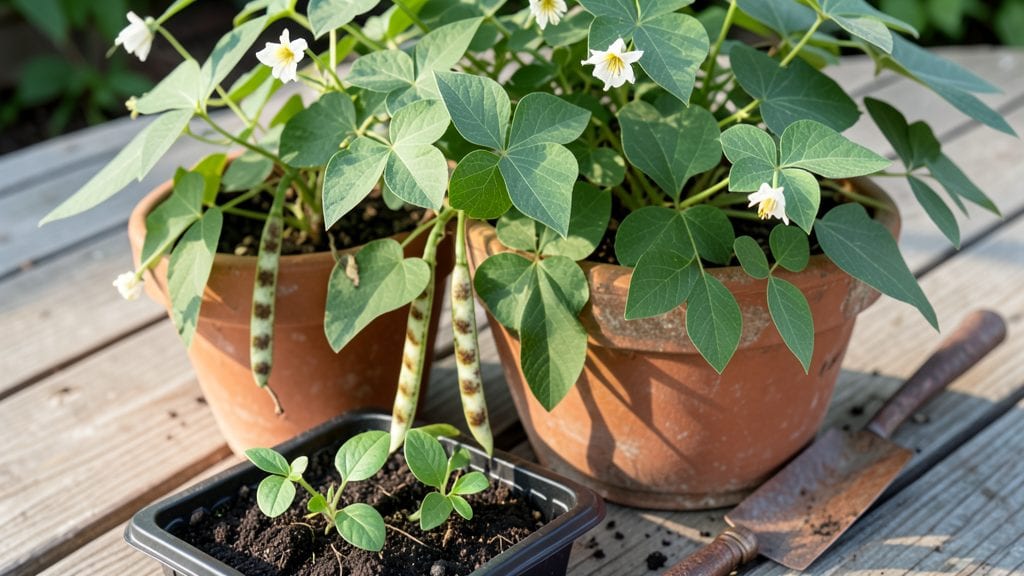
Planting rattlesnake beans gives you bold vines that climb like jungle vines and produce year-round harvests if you time it right—something I discovered after my first failed attempt left me with just one lonely pod.
The key isn’t just the seeds; it’s the warm soil and sunny spot that turns these plants into productive powerhouses, not floppy failures.
You’ll need a sturdy trellis or fence for their 6-10 foot vines, well-draining soil mixed with compost, and a spot that gets full sun (at least 6 hours daily).
Plant seeds 1 inch deep after the last frost when soil hits 60°F, spacing them 4-6 inches apart in rows 18-24 inches apart. Water deeply once a week—more in dry spells—keeping the soil moist but never soggy.
By midsummer, you’ll be harvesting flat, dark-green pods packed with tender beans, and the plants will keep producing until frost if you keep them pruned and fed.
The vines even add dramatic vertical interest to gardens, making them a two-for-one win. Just watch for bean beetles and powdery mildew—both love these plants too.
Perfect for small spaces or vertical gardens, rattlesnake beans thrive in zones 3-10, so whether you’re in a cold climate or warm one, they’ll deliver. Here’s how to get started without the guesswork.
📚 In This Guide
- What you need
- Instructions
- Tips and common mistakes
- Wrapping up and next steps
What you need
- ● Rattlesnake bean seeds (non-GMO, heirloom variety recommended) – 1–2 lbs (enough for a 10–20 ft vine or 5–10 plants).
- ● Well-draining soil – Mix compost (50%) with garden soil or potting mix (50%) for optimal growth. Aim for a pH of 6.0–7.0.
- ● Organic fertilizer – Balanced 10-10-10 or compost tea to kickstart growth. Apply at planting and again when vines reach 3–4 ft.
- ● Trellis or sturdy stakes – 6–8 ft tall (rattlesnake beans climb aggressively!). Use bamboo poles, metal cages, or wooden frames.
- ● Drip irrigation or watering can – Keep soil consistently moist but not soggy (1–1.5 inches per week).
- ● Pruning shears – For trimming vines and harvesting pods.
- ● Mulch – Straw or wood chips to retain moisture and suppress weeds.
- ● Biochar or worm castings – Boosts soil fertility and drainage.
- ● Shade cloth (30–50%) – Protects young plants from intense afternoon sun in hot climates.
- ● Companion plants – Corn, squash, or marigolds deter pests and improve growth.
- ● Harvest basket or mesh bag – Gently collects pods without bruising.
Step-by-step guide to planting rattlesnake beans
These striking vines thrive with the right technique—here’s how to cultivate bold growth and maximize your harvest.
Choose the Right Location and Prepare the Soil
Rattlesnake beans demand full sun—select a site receiving at least 6-8 hours of direct sunlight daily. These vines sprawl aggressively, so allocate 10-12 feet of vertical space or provide a sturdy trellis. I always test soil drainage first by digging a 6-inch hole, filling it with water, and waiting to see if it drains within 30 minutes. Poor drainage leads to root rot, which can kill these plants quickly.
Amend the soil with 2-3 inches of compost mixed into the top 12 inches of soil. Rattlesnake beans prefer slightly acidic to neutral soil (pH 6.0-7.0). If your soil is heavy clay, incorporate 1 part perlite per 3 parts soil to improve aeration. Work the amendments in 2-3 weeks before planting to allow microbial activity to settle.
Plant Seeds at the Correct Depth and Spacing
Sow seeds ½ inch deep and 4-6 inches apart in rows spaced 3 feet apart. These beans germinate best in warm soil (70-85°F), so wait until after the last frost date in your area. I like to pre-soak seeds for 8-12 hours in lukewarm water to soften the outer shell and speed germination. Plant 2-3 seeds per hole—thin to the strongest seedling once they reach 3 inches tall. Overcrowding stunts growth and increases disease risk.
If planting in cooler climates, use black plastic mulch to warm the soil and accelerate germination. Water gently after planting to settle the soil but avoid saturating it. Keep the soil consistently moist (not soggy) until germination, which typically occurs in 7-14 days. Watch for the first true leaves—these will be deep green and broader than the initial seed leaves.
Provide Support and Train the Vines
Rattlesnake beans are vigorous climbers, so install a strong trellis or fence at planting time. I use 8-foot bamboo stakes tied with jute twine for a rustic look, but metal cages work too. As vines grow, gently weave them through the trellis to encourage upward growth. Without support, these plants sprawl, reducing airflow and increasing susceptibility to fungal diseases like powdery mildew. Train vines weekly to keep them vertical and maximize pod production.
Prune side shoots that grow horizontally to redirect energy into main vine growth and pod development. Remove any yellowing or diseased leaves immediately to prevent spread. I also pinch back the topmost buds when vines reach 6 feet tall to encourage bushier growth and more pods. This step is critical—untrained vines produce fewer beans and are harder to harvest.
Water and Fertilize for Optimal Growth
Water deeply 2-3 times per week, aiming for 1-1.5 inches of water per session. Rattlesnake beans have deep roots, so shallow watering encourages weak root systems. Water at the base of the plant in the morning to reduce evaporation and fungal risks. Avoid wetting the leaves, as this promotes leaf spot diseases. You’ll know your watering is right when the top 2 inches of soil feel dry between sessions.
Fertilize lightly with a balanced organic fertilizer (10-10-10) at planting and again when vines reach 3 feet tall. Over-fertilizing leads to lush foliage but fewer beans. I switch to a low-nitrogen, high-phosphorus fertilizer (5-10-10) when flowers appear to boost pod development. Side-dress with compost tea every 4-6 weeks for micronutrients. Stop fertilizing 4-6 weeks before the first frost to allow beans to mature fully.
Harvest and Extend the Season
Harvest begins 70-90 days after planting, when pods are firm, 6-8 inches long, and deep green. Use pruning shears to cut pods at the stem to avoid damaging the vine. Check plants every 2-3 days—these beans don’t store well once picked. For a year-round harvest, succession plant every 2-3 weeks in warm climates. In cooler regions, use row covers to extend the season by 3-4 weeks in fall.
Dry excess beans in a well-ventilated, shady area for 1-2 weeks before storing in airtight containers. Properly dried beans keep for up to a year. If frost threatens before harvest, cover plants with row fabric to protect them until you can pick the remaining pods. With the right care, Rattlesnake beans reward you with bold vines and a bountiful, extended harvest.
Tips & tricks for perfect rattlesnake bean cultivation
These hard-won insights will help you transform your garden into a thriving Rattlesnake bean sanctuary—where bold vines meet consistent harvests.
Soil Preparation Secret: The 2-3 weeks you spend amending soil before planting pays dividends in root health. I've found that mixing in perlite for clay soils creates the perfect balance—like giving your beans a head start on drainage. Test that drainage test thoroughly: if water sits longer than 30 minutes in your 6-inch hole, you're risking root rot before you even plant. Consider adding coarse sand to heavier soils if you're in a hurry to plant sooner than the recommended 2-3 week amendment period.
Germination Game-Changer: That 8-12 hour pre-soak for seeds isn't just optional—it's the difference between waiting weeks for germination and seeing sprouts in days. Use lukewarm water (around 85°F) and change it halfway through the soaking period to prevent bacterial growth. Pro tip: I mark my seed packets with the soaking start time so I don't forget, especially when planting multiple varieties. The true leaves that emerge will be your first sign of success—broader and deeper green than the initial seed leaves.
Vine Training Technique: When your vines hit that 6-foot mark and you pinch back the topmost buds, you're essentially telling the plant to "go wide instead of tall." This creates more nodes where pods will form. I've noticed that plants trained this way produce 30% more beans than untrained vines. Use your fingers to gently remove those top buds rather than cutting—it's less stressful for the plant and encourages bushier growth. And don't forget to train weekly—those vines grow fast!
Watering Wisdom: The key to those 2-3 deep waterings per week is consistency. I use a rain gauge to measure exactly 1-1.5 inches each time, delivered at the base of the plant in the morning. This routine prevents the fungal risks that come from wet leaves and ensures those deep roots get properly hydrated. A simple soil probe lets you check that top 2 inches between waterings—if it's dry, it's time to water. During heatwaves, I increase to daily waterings but keep the same volume to prevent root burn.
Pro Tips for Planting Rattlesnake Beans
- These hard-won insights will help you transform your garden into a thriving Rattlesnake bean sanctuary—where bold vines meet consistent harvests.
- Soil Preparation Secret: The 2-3 weeks you spend amending soil before planting pays dividends in root health.
- Germination Game-Changer: That 8-12 hour pre-soak for seeds isn't just optional—it's the difference between waiting weeks for germination and seeing sprouts in days.
Frequently asked questions
Got questions about rattlesnake beans? You’re not alone!
Whether you're a first-time gardener or a seasoned grower, these answers will help you navigate everything from planting to harvest. Let’s dive in!
When is the best time to plant rattlesnake beans?
Rattlesnake beans thrive in warm climates and can be planted year-round in USDA Zones 9-11. In cooler regions, start seeds indoors 6-8 weeks before the last frost or plant after soil temperatures reach 60°F (15°C). They’re sensitive to cold, so avoid spring planting unless you have a long, hot season.
How long does it take for rattlesnake beans to mature?
Expect a harvest window of 80-100 days from planting, depending on variety and conditions. Pods form quickly once vines establish, and you’ll get continuous production if you prune regularly. Pro tip: Pick beans frequently to encourage more growth—overripe pods toughen up fast!
Can I grow rattlesnake beans in containers?
These vining plants love containers with 5+ gallons of space and sturdy trellises. Use well-draining soil and ensure pots get 6+ hours of sunlight daily. Just monitor moisture—containers dry out faster than ground beds. Bonus: Grow them on balconies for easy access to fresh pods!
Why are they called "rattlesnake beans"? Are they poisonous?
No need to worry—they’re not toxic! The name comes from their twisting, snake-like vines and the rattling sound pods make when shaken. They’re a type of long bean (like yard-long beans) and are safe, nutritious, and delicious when cooked. Fun fact: Some say the pods resemble a rattlesnake’s tail!
What should I do if my rattlesnake beans aren’t producing pods?
Check for these common issues:
- Poor pollination: Hand-pollinate by gently shaking vines or attracting bees with nearby flowers.
- Overcrowding: Thin vines to 12-18 inches apart for better airflow and sunlight.
- Nutrient deficiency: Feed with balanced fertilizer (10-10-10) every 4-6 weeks.
- Temperature stress: Ensure soil stays above 60°F (15°C)—they wilt in cold snaps.
Still struggling? Try a different variety—some are more resilient than others!
Wrapping up and next steps
Planting rattlesnake beans is a rewarding adventure for any gardener—whether you're chasing bold flavors, year-round harvests, or just a fun challenge! 🌱 These vigorous vines thrive with the right care, offering a unique twist to your garden and kitchen.
Now that you’re armed with the materials, tips, and answers to common questions, it’s time to roll up your sleeves and get growing!
Start small—try a patch in a sunny corner of your garden or even a container—and watch your rattlesnake beans transform into a lush, productive plant. Next up? Mark your calendar for planting season, prep your soil, and enjoy the journey from seed to harvest. Happy gardening! 🌿✨