Diseases
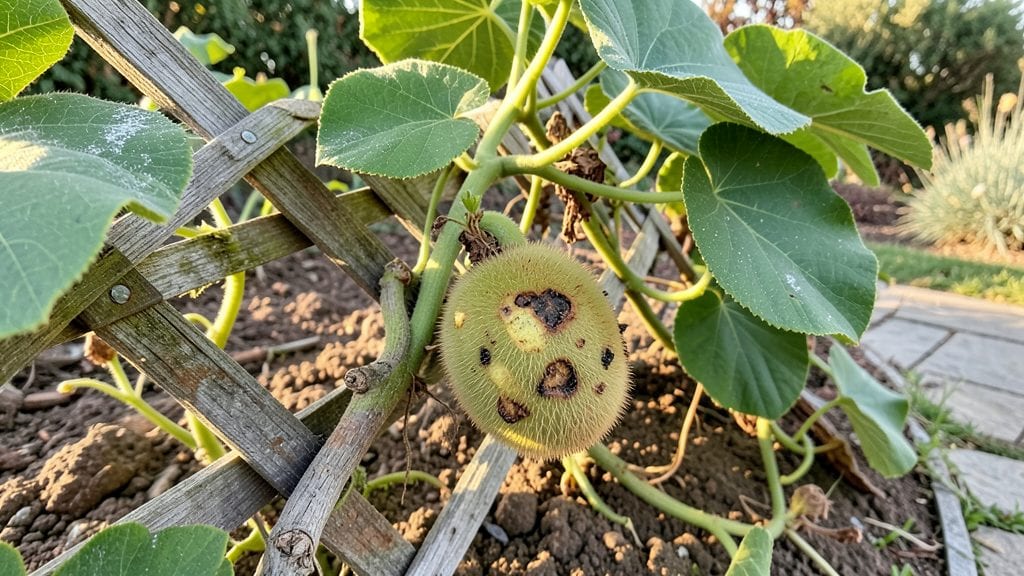
Kiwi plant diseases can turn your vines into a sad, yellowing mess if you don’t catch them early. 🌿 I’ve seen bacterial canker eat through entire plants in weeks—until I learned the warning signs and how to stop it before it spreads.
The key is knowing what to look for and acting fast, whether it’s pruning infected branches or adjusting watering habits.
Most kiwi diseases start with wilting leaves, dark spots, or strange growths on the bark. Powdery mildew leaves a white, dusty coating, while root rot makes the soil smell foul and the vine collapse. The good news?
Organic sprays like neem oil, copper fungicide, or even a baking soda mix can save your plants if you catch the problem early. Prevention—like proper spacing and airflow—keeps them healthy in the first place.
📚 In This Guide
- What you need
- Instructions
- Tips and common mistakes
- Wrapping up and next steps
What you need
- ● Pruning shears – Sharp, sterilized shears for trimming infected vines or leaves (1 pair).
- ● Gloves – Heavy-duty, chemical-resistant gloves (1 pair) to protect your hands from sap and treatments.
- ● Spray bottle – 16 oz (473 mL) for diluted fungicides or homemade remedies.
- ● Fungicide – Copper-based or neem oil-based (1 gallon/3.8 L), or a commercial product like Bonide Copper Fungicide.
- ● Disinfectant – 70% isopropyl alcohol or bleach solution (1:10 ratio with water) for cleaning tools.
- ○ Magnifying glass (optional) – Helps spot early signs of disease on leaves or stems.
- ○ pH test kit (optional) – Ensures soil pH is optimal (6.0–6.5 for kiwi plants).
- ● Face mask – For handling strong chemicals or pruning in dusty conditions.
- ● Plastic sheeting – 4’x6’ (1.2m x 1.8m) to lay under plants during treatment.
- ● Labels & markers – To tag treated plants and track disease progression.
- ● Access to a water source for rinsing tools and plants.
- ● Basic knowledge of kiwi plant anatomy (leaves, vines, fruit) to identify symptoms.
- ● Time to monitor plants weekly for early signs of disease.
How to diagnose and treat common kiwi plant diseases
Kiwi vines are tough, but these diseases can turn your harvest into a bust. Here’s how to spot, stop, and prevent the most troublesome ones before they ruin your plants.
🌿 Step 1: Identify the Problem with Visual Clues
Start by inspecting your kiwi leaves, stems, and fruit for telltale signs. Powdery mildew appears as white, powdery patches on leaves—like someone dusted them with flour. Bacterial canker shows up as sunken, oozing lesions on branches, often with dark streaks. Root rot is trickier: look for yellowing leaves, wilting even when soil is moist, and a foul smell at the base of the vine.
Check the undersides of leaves for rust, which looks like orange pustules. If you see dark spots with yellow halos on leaves, that’s likely anthracnose. Compare what you see to photos of these diseases—early detection is your best defense. I always examine my vines on a cloudy morning when leaves are damp with dew, making signs easier to spot.
💧 Step 2: Treat Fungal Diseases with Targeted Care
For powdery mildew or rust, spray your kiwi vines with a neem oil solution (1 tablespoon per quart of water) every 7-10 days until the problem clears. Neem oil smothers fungal spores while being safe for plants. Apply in the early morning so the solution has time to dry before evening humidity sets in.
If you’re dealing with anthracnose, remove and destroy infected leaves immediately—don’t compost them. Prune back affected branches by 4-6 inches below the damage to prevent spread. Water at the base of the plant, not overhead, to keep leaves dry. Fungal spores thrive in wet foliage, so good airflow is key—space vines 6-8 feet apart and thin out crowded branches.
✂️ Step 3: Combat Bacterial Canker with Pruning and Cleanliness
Bacterial canker is aggressive—once it sets in, there’s no cure. Your only option is to prune infected branches back to healthy wood using sterilized pruners (wipe blades with rubbing alcohol between cuts). Bag and discard infected branches in the trash, not your compost pile.
After pruning, apply a copper fungicide to the wounds to slow bacterial spread. Avoid wounding the vine further, as fresh cuts give bacteria an entry point. Keep the area under the vine free of debris—mulch with 2-3 inches of straw to improve drainage and reduce splashing water onto stems.
🪴 Step 4: Fix Root Rot with Drainage and Adjustments
If your kiwi vine is wilting despite moist soil, root rot is likely the culprit. First, stop watering immediately—kiwi vines need well-draining soil and hate soggy roots. Check the drainage in your pot or garden bed: if water pools after 30 minutes, amend the soil with organic matter like compost or coconut coir to improve aeration.
If the vine is severely affected, you may need to repot it into fresh, sterile potting mix. Trim away any black, mushy roots with sterilized scissors. After replanting, water lightly and hold off on fertilizing until new growth appears—stressed roots can’t handle extra nutrients. Moving forward, water only when the top 2 inches of soil feel dry.
☀️ Step 5: Prevent Future Outbreaks with Proactive Care
Healthy kiwi vines resist disease better. Start by pruning for airflow—remove any branches rubbing against each other or blocking sunlight. Space vines properly and avoid overhead watering. If you’re growing in containers, ensure pots have drainage holes and never let them sit in saucers of water.
Apply a balanced fertilizer (like 10-10-10) in early spring to boost vine vigor. Stronger plants fend off pests and diseases more effectively. Monitor your vines weekly during growing season—catching issues early means less damage and fewer headaches. I keep a small notebook by my garden tools to log symptoms and treatments, which helps me spot patterns over time.
Tips & tricks for kiwi plant disease prevention
Kiwi vines may seem resilient, but diseases can sneak in and wreak havoc if you're not careful. Here are the key strategies I've learned to keep your plants thriving and catch problems before they spread.
Early Morning Inspection: I always check my kiwi vines on cloudy mornings when dew is present—this is when symptoms like powdery mildew or rust are most visible. The damp conditions make the white powdery patches or orange pustules stand out clearly against the leaves. This is also the best time to spot bacterial canker's dark streaks before they become too severe.
Neem Oil Application: When treating powdery mildew or rust, I've found that applying the neem oil solution in the early morning is absolutely critical. The solution needs several hours to dry completely before evening humidity sets in, which can otherwise create the perfect conditions for fungal spores to thrive. I always mix my neem oil solution fresh each time to ensure maximum effectiveness.
Pruning Technique: For bacterial canker, I sterilize my pruners with rubbing alcohol between every cut to prevent cross-contamination. After pruning, I immediately apply copper fungicide to the wounds—this creates a protective barrier that helps slow the spread of bacteria. I also make sure to dispose of infected branches in sealed plastic bags rather than composting them, as the bacteria can survive in compost.
Drainage Check: The 30-minute drainage test is my go-to method for diagnosing potential root rot issues. After watering, if water still pools in the pot or garden bed after 30 minutes, I know I need to improve drainage immediately. I've had the most success amending the soil with a mix of compost and coconut coir—this improves aeration while providing essential nutrients that stressed roots need to recover.
Pro Tips for Kiwi Plant Diseases
- Kiwi vines may seem resilient, but diseases can sneak in and wreak havoc if you're not careful.
- Early Morning Inspection: I always check my kiwi vines on cloudy mornings when dew is present—this is when symptoms like powdery mildew or rust are most visible.
- Neem Oil Application: When treating powdery mildew or rust, I've found that applying the neem oil solution in the early morning is absolutely critical.
Frequently asked questions
Got questions about kiwi plant diseases? You’re not alone! Here are some of the most common concerns—and quick answers to keep your vines thriving.
What are the most common kiwi plant diseases I should watch for?
The top culprits include Phytophthora root rot (waterlogged soil), powdery mildew (white fungal spots), and bacterial canker (oozing sores). Botrytis fruit rot also targets ripe kiwis. Act fast—early signs like yellowing leaves or mold mean it’s time to intervene!
When is the best time to treat kiwi plant diseases?
Timing is key! Treat powdery mildew at the first sign (spring/summer), root rot when soil stays soggy for weeks, and bacterial canker before winter dormancy. Preventative sprays (copper fungicide) in early spring can stop many issues before they start.
Are there natural remedies for kiwi plant diseases?
Yes! For powdery mildew, mix 1 tbsp baking soda + 1 tsp soap in a gallon of water and spray weekly. Neem oil fights fungal/bacterial issues, while compost tea boosts soil health. Caution: Severe infections (like root rot) may need fungicides.
How do I prevent kiwi plant diseases from spreading to other plants?
Isolate infected vines immediately, sterilize pruners with rubbing alcohol, and remove diseased leaves/fruit. Rotate crops if replanting, and avoid overhead watering. Mulch with straw to reduce soil splash—disease spreads fast in wet conditions!
My kiwi plant has brown spots—is it a disease or just sunburn?
Sunburn causes crispy, dry brown patches on leaves/fruit (often on one side). Diseases like anthracnose create soggy, dark spots with yellow halos. Test it: Gently scrape a spot—if it’s mushy or smells foul, it’s likely a disease.
Wrapping up and next steps
Protecting your kiwi plants from diseases doesn’t have to be overwhelming—just stay vigilant, act fast, and prioritize prevention! 🌱 By recognizing early signs like powdery mildew or bacterial canker, using the right treatments (organic or chemical), and maintaining good garden hygiene, you’ll keep your vines thriving. Remember: healthy soil and proper spacing are your best defenses!
Ready to take action? Start with a quick inspection of your plants today—early detection saves time and effort. Need more tips? Bookmark this guide or share it with fellow gardeners to spread the knowledge! 🌟