Vegetables
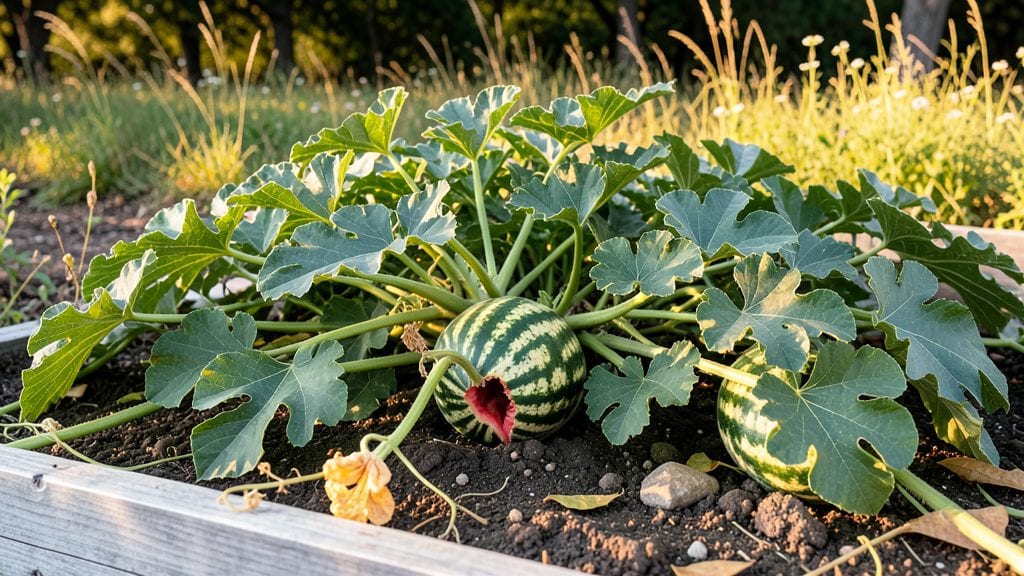
The crimson watermelon plant delivers the most striking fruit in your garden—deep red flesh that tastes sweeter than store-bought varieties. 🌿 I learned the hard way that this variety demands patience and precise care, but the payoff is worth every effort.
The secret lies in mimicking its natural tropical roots while adapting to your climate.
You’ll need well-draining soil with a pH between 6.0 and 6.8, plus 18-24 inches of space between vines to sprawl freely. Start seeds indoors 4-6 weeks before your last frost, then transplant after soil warms to 70°F.
These plants thrive in full sun (6-8 hours daily) and need consistent moisture—drought stress turns fruit bitter.
By midsummer, you’ll see those signature yellow blossoms attracting bees, followed by 30-40 pound melons with crisp rinds. The crimson variety ripens 2-3 weeks later than standard types, so mark planting dates carefully. Harvest when the underside turns cream-colored and the tendril nearest the fruit dies back.
Perfect for warm climates but adaptable with season extension. Here’s how to avoid common pitfalls like blossom-end rot or powdery mildew—plus how to maximize sweetness in every slice.
📚 In This Guide
- What you need
- Instructions
- Tips and common mistakes
- Wrapping up and next steps
What you need
- ● Crimson watermelon seeds – 3–5 seeds per plant (or 1–2 per pot if container-growing). Choose heirloom or hybrid varieties like 'Crimson Sweet' or 'Crimson Tide'.
- ● Well-draining potting mix – A high-quality seed-starting mix or a blend of 50% peat/coir, 30% perlite, and 20% compost.
- ● Containers or garden bed – For direct sowing: A sunny garden plot with 6–10 feet of space per plant (watermelons vine aggressively!). Soil should be 60–65°F (15–18°C).
- ● For container growing: 5-gallon pots or larger (minimum 12" deep) with drainage holes.
- ● Organic fertilizer – A balanced 10-10-10 or 5-5-5 fertilizer (or compost/manure for organic growers). Use 1 tbsp per plant at planting and every 4–6 weeks.
- ● Mulch (straw or black plastic) – To retain moisture and suppress weeds. 2–3 inches of mulch works best.
- ● Hand trowel or transplanting spade – For digging and planting.
- ● Garden gloves – To protect your hands from thorns and soil.
- ● Watering can or hose with a gentle spray nozzle – Watermelons need 1–2 inches of water per week.
- ○ Trellis or cage (optional) – If you want to partially control vining (though watermelons thrive sprawling). Use a 6–8 ft tall structure.
- ○ Pollinator-friendly plants (optional) – Bee balm, sunflowers, or marigolds nearby to boost fruit set.
- ● Row covers (early season) – To protect young plants from pests or frost (lightweight fabric works best).
Step-by-Step guide to growing crimson watermelon plants
Here’s how to cultivate vibrant, productive vines that reward you with striking red fruit.
🌱 Step 1: Prepare Your Planting Site for Optimal Growth
Crimson watermelons thrive in full sun—choose a location that receives at least 8 hours of direct sunlight daily. Before planting, loosen the soil to a depth of 12 inches to encourage root penetration. Work in 2-3 inches of compost (from your materials list) to enrich the soil with nutrients and improve drainage.
Watermelons are heavy feeders, so mix in a balanced, slow-release fertilizer (like the 10-10-10 type) at planting time. This ensures steady growth without overwhelming the plants early on. Avoid fresh manure—it can burn tender roots and attract pests. If your soil is heavy clay, add 1-2 inches of coarse sand to improve aeration.
🌱 Step 2: Plant Seeds or Transplants at the Right Time
Wait until the soil temperature reaches at least 70°F—cold soil delays germination and weakens seedlings. Plant seeds 1 inch deep in hills spaced 6 feet apart, with 3-4 seeds per hill. This spacing gives vines room to sprawl and reduces competition for nutrients. Thin to the strongest seedling per hill once they’re 3-4 inches tall.
If using transplants, harden them off for 7-10 days before moving them outside. Crimson watermelons are sensitive to transplant shock, so handle seedlings gently and avoid disturbing the roots. Plant them at the same depth they grew in their containers, and water deeply right after to settle the soil around the roots.
☀️ Step 3: Provide Consistent Water and Support for Heavy Fruit
Watermelons need 1-1.5 inches of water per week, delivered at the base of the plant to prevent fungal diseases. Use drip irrigation or soaker hoses to keep foliage dry—wet leaves encourage powdery mildew. Mulch with straw or black plastic (from your materials) to retain moisture and suppress weeds, which compete for water and nutrients.
As vines grow, train them onto a trellis or sturdy fence to save space and reduce soil-borne diseases. Crimson watermelons produce heavy fruit, so secure the trellis with strong stakes or cables. Prune lateral vines after the first 6-8 inches of growth to direct energy into 1-2 main vines per plant. This ensures larger, sweeter fruit.
✂️ Step 4: Monitor for Pollinators and Harvest at Peak Ripeness
Crimson watermelons rely on bees and other pollinators for fruit set. Plant companion flowers like marigolds nearby to attract them. If pollination is poor in cool weather, hand-pollinate by transferring pollen with a small brush between male and female flowers (female flowers have tiny watermelon shapes at their base).
Harvest when the underbelly turns cream-colored and the tendril nearest the fruit dries up. Crimson watermelons are ripe when they sound hollow when tapped and smell sweet near the stem. Cut fruit from the vine with a sharp knife, leaving 1-2 inches of stem attached to preserve freshness. Store in a cool, dry place for up to 2 weeks.
Tips & tricks for growing crimson watermelon plants
Here's what I've learned from years of growing these vibrant watermelons—tricks that'll help you avoid common pitfalls and maximize your harvest.
Soil Temperature Matters: That 70°F soil temperature threshold in Step 2 is non-negotiable. I've seen seeds fail to germinate when planted in cooler soil, no matter how well-prepared the bed. Use a soil thermometer to verify—if it's below 70°F, wait a few more days. Cold soil slows root development and makes seedlings more susceptible to disease. For northern gardeners, consider using black plastic mulch to warm the soil faster.
Pruning Strategy: When pruning those lateral vines after the first 6-8 inches of growth in Step 3, focus on removing any that grow below the main vine. This directs all the plant's energy into producing 1-2 strong main vines that will support larger fruit. I've found that plants with too many vines produce smaller, less flavorful melons. Use sharp pruning shears to avoid damaging the main stems.
Pollination Backup Plan: While bees will handle most pollination, having a hand-pollination kit ready is smart. I keep a small brush and a magnifying glass on hand—especially in early spring or late fall when pollinator activity is low. Focus on the female flowers (look for the tiny watermelon shape at the base) and transfer pollen from male flowers (those with long stems and no fruit) to their stigmas. Do this in the morning when flowers are freshest for best results.
Harvesting Cues: The cream-colored underbelly and dried tendril in Step 4 are reliable indicators, but don't ignore the other senses. A ripe Crimson watermelon should have a deep, sweet aroma near the stem—almost like a mix of honey and cucumber. When you tap it, the hollow sound comes from the fully developed seed cavity. I've learned to harvest slightly earlier than some guides suggest—these melons continue ripening off the vine for a day or two, and overripe ones develop a grainy texture.
Pro Tips for Crimson Watermelon Plant
- Here's what I've learned from years of growing these vibrant watermelons—tricks that'll help you avoid common pitfalls and maximize your harvest.
- Soil Temperature Matters: That 70°F soil temperature threshold in Step 2 is non-negotiable.
- Pruning Strategy: When pruning those lateral vines after the first 6-8 inches of growth in Step 3, focus on removing any that grow below the main vine.
Frequently asked questions
Got questions about growing or caring for your crimson watermelon plant? You’re not alone! Here are some of the most common queries—plus quick, actionable answers to keep your vines thriving and your harvest bold.
How long does it take for a crimson watermelon plant to produce fruit?
A crimson watermelon plant typically takes 70–90 days from seed to ripe fruit, depending on your climate and growing conditions. In warmer regions, you might see fruit as early as 65 days, while cooler zones may extend the timeline. Pro tip: Plant after the last frost when soil temps hit 70°F+ for best speed!
Can crimson watermelon plants survive frost?
Nope! Crimson watermelon plants are tender perennials that cannot tolerate frost. Even a light freeze will kill the vines. Start seeds indoors 3–4 weeks before your last frost date, then transplant after all danger of frost has passed. Pro tip: Use black plastic mulch to warm the soil faster!
Why aren’t my crimson watermelon flowers being pollinated?
Poor pollination is often due to lack of bees or wind. Crimson watermelons rely on pollinators—plant bee-friendly flowers nearby (like marigolds or sunflowers) to attract them. If bees are scarce, hand-pollinate by gently transferring pollen with a paintbrush. Pro tip: Pollinate in the morning when flowers are open!
What’s the best way to tell when a crimson watermelon is ripe?
Look for these signs: 1) The tendril near the stem turns brown and dries out. 2) The rind is dull and hard (not shiny). 3) Tap it—ripe watermelons sound deep and hollow. Pro tip: For extra accuracy, check the field spot (the cream-colored patch)—it should turn yellowish!
Can I grow crimson watermelons in containers?
Yes! Crimson watermelons thrive in large containers (at least 5 gallons) with 10+ inches of depth. Use a lightweight potting mix and a trellis to support vines. Pro tip: Choose smaller varieties like ‘Crimson Sweet’ for better container success!
What should I do if my crimson watermelon leaves turn yellow?
Yellow leaves usually signal overwatering, nutrient deficiency, or disease. First, check soil moisture—watermelons hate soggy roots! If yellowing spreads, test for nitrogen deficiency (use a balanced fertilizer). Pro tip: If spots appear, remove affected leaves and avoid overhead watering to prevent fungal issues.
Wrapping up and next steps
Growing a crimson watermelon plant isn’t just about harvesting sweet, vibrant fruit—it’s a rewarding journey that supports pollinators and adds a splash of drama to your garden. 🌱 With the right care, patience, and a dash of creativity, you’ll enjoy both stunning blooms and juicy rewards.
Ready to take the next step? Start small—plant a few seeds this season, experiment with trellising or companion planting, and watch your garden thrive! Whether you’re a novice or a seasoned gardener, every slice of success is worth celebrating.