Shrubs
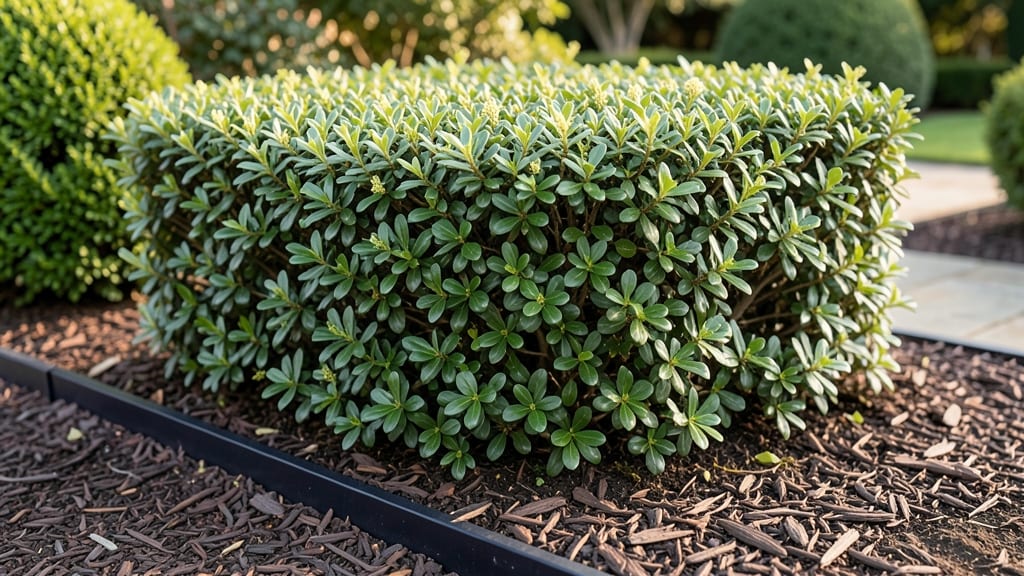
Structured boxwood foundation planting transforms a plain house border into a polished, evergreen statement that never goes out of style. 🌿 I learned the hard way that spacing matters—too tight, and the plants compete for sunlight; too wide, and the look feels sparse.
The key is balancing density with airflow to keep them lush year-round.
Start with mature boxwoods spaced 2–3 feet apart for a dense, formal hedge, or 3–4 feet for a more relaxed, natural look. Pair them with low-growing perennials like ajuga or sedum to fill gaps while controlling weeds.
This combo keeps maintenance simple: prune boxwoods once a year, and the ground cover handles the rest.
What you’ll end up with is a border that stays green through winter, frames your home elegantly, and cuts down on yard work. The dark green foliage contrasts beautifully with brick or siding, while seasonal blooms from companion plants add pops of color without overpowering the structure.
Works equally well for modern farmhouses or classic colonials, and adapts to sunny or partially shaded spots. Here’s how to map it out without overcomplicating the design—even if you’re not a pro.
📚 In This Guide
- What you need
- Instructions
- Tips and common mistakes
- Wrapping up and next steps
What you need
- ● Boxwood shrubs: 3–5 plants per 10 feet of foundation (depending on desired spacing—typically 3–4 feet apart). Choose Buxus sempervirens (common boxwood) or Buxus microphylla (dwarf varieties for tighter spaces).
- ● High-quality topsoil or amended soil: 1–2 cubic yards (enough to fill planting holes to the root flare level). Mix with compost (20–30% by volume) for nutrient-rich soil.
- ● Organic mulch: 2–3 inches of shredded bark, pine straw, or cypress mulch (cover the entire planting bed, keeping mulch 3 inches away from plant stems).
- ● Slow-release fertilizer: 10–10–10 or 12–12–12 (1–2 lbs per 100 sq ft) to kickstart growth.
- ● Garden hose or watering can with spray nozzle: For thorough watering after planting.
- ● Gloves and knee pads: Protect your hands and knees during the process!
- ● Shovel or spade: For digging planting holes (12–18 inches wide and deep).
- ● Garden trowel: For backfilling soil and smoothing roots.
- ● Measuring tape: To ensure even spacing between plants.
- ○ String and stakes (optional but helpful): For marking straight lines and maintaining uniformity.
- ● Soil test kit: To check pH and nutrient levels (boxwood prefers slightly acidic to neutral soil, pH 6.0–7.0).
- ● Root stimulator: Like Mycorrhizal fungi or seaweed extract to boost early root growth.
- ● Edging tools: For clean, crisp borders around your foundation planting.
- ● Drip irrigation system: For consistent moisture, especially in hot climates.
- ● Decorative rocks or gravel: To add texture and contrast to the mulch.
How to create a polished boxwood foundation border
Boxwoods deliver timeless structure—here’s how to plant them with precision for a flawless, low-maintenance foundation.
🌱 Step 1: Prepare the Planting Site and Soil
Choose a location with 6 hours of sunlight and well-draining soil—boxwoods hate soggy roots. Test the soil pH (ideal range is 6.0-7.0). If your soil is heavy clay, amend it with 2-3 inches of compost mixed into the top 12 inches of soil. Boxwoods thrive in slightly acidic to neutral conditions, so a soil test kit ensures you won’t end up with yellowing leaves from incorrect pH.
Mark the planting spots with stakes or spray paint, spacing them 3-4 feet apart for mature size. Dig holes twice as wide as the root ball but no deeper—this prevents root suffocation. Loosen the sides of each hole with a shovel to encourage root spread. I always water the holes thoroughly before planting to help settle the soil around the roots later.
🪴 Step 2: Plant Boxwoods at the Correct Depth and Spacing
Remove each boxwood from its container and gently tease the roots outward if they’re circling. Place the plant in the hole so the top of the root ball sits level with the surrounding soil—burying too deep smothers the plant, while planting too high stresses it. Fill the hole with native soil, pressing lightly to eliminate air pockets but avoiding compaction.
Water deeply to settle the soil, then add a 1-inch layer of mulch (like shredded bark) around the base, keeping it 3 inches away from the stem to prevent rot. This mulch layer conserves moisture and regulates soil temperature, which is critical in hot climates. I always step back and check the spacing—4 feet apart ensures mature plants form a seamless, unbroken hedge without gaps.
☀️ Step 3: Water and Establish the Plants
Water each newly planted boxwood with 1 gallon of water immediately after planting, then 2 gallons weekly for the first 4-6 weeks. Deep, infrequent watering encourages strong root growth—shallow watering leads to weak, shallow roots that struggle in drought. You’ll know the watering is right when the soil feels moist but not saturated down to 6 inches deep.
After establishment, reduce watering to 1 gallon every 10-14 days unless your area experiences extreme heat or drought. Boxwoods are drought-tolerant once established, but consistent moisture during the first year is non-negotiable. I always check soil moisture by hand—if the top 2 inches feel dry, it’s time to water.
✂️ Step 4: Prune for Shape and Health
Wait 6-8 weeks after planting before pruning—this gives roots time to recover. Use clean, sharp shears to trim back any dead or damaged branches first. For shaping, cut just above a leaf bud or branch junction at a 45-degree angle to encourage new growth. Boxwoods respond well to light pruning, so avoid heavy cuts that can stress the plant.
For a formal hedge, prune twice yearly: once in late spring after new growth appears, and again in early summer to maintain shape. I always step back and visualize the final look—smooth, tapered edges create the most elegant foundation border. Never prune into old wood, as boxwoods won’t regrow from bare stems.
🌿 Step 5: Maintain for Long-Term Elegance
Fertilize in early spring with a balanced, slow-release fertilizer (10-10-10) applied at half the recommended rate. Over-fertilizing causes excessive growth that weakens the plant. Water deeply after applying fertilizer to help it reach the roots. Boxwoods are low-maintenance once established, but I still check for aphids or mites monthly—spray with neem oil if you spot any pests.
In late winter, apply a 2-inch layer of mulch to protect roots from freezing temperatures. This also suppresses weeds, which compete for nutrients. Boxwoods are evergreens, so they don’t need winter protection beyond proper mulching. I always inspect the plants in early spring for brown tips—a sign of winter burn or over-salting from road salt—treating with a fungicide if needed.
Tips & tricks for perfect boxwood foundation planting
A few strategic moves will ensure your boxwood border stays flawless for years—these are the secrets that separate a good hedge from a truly elegant one.
The Sunlight Secret: That 6 hours of sunlight requirement isn't just a suggestion—it's the foundation of healthy growth. South-facing locations get the most light, but east or west exposures work too as long as they avoid harsh afternoon sun in hot climates. I've seen boxwoods struggle in north-facing spots where they get only 4-5 hours of light, leading to sparse growth and yellowing leaves. If your site gets less than 6 hours, consider adding a small trellis for additional support and light exposure.
Root Ball Revelation: When planting, the top of the root ball should be level with the surrounding soil—this is non-negotiable for boxwoods. I learned this the hard way after burying plants too deep, which caused root suffocation and poor growth. To check depth, use a level or reference the container's rim. Also, those twice-as-wide holes aren't just for show—they encourage root spread, which translates to stronger plants that handle drought better.
Watering Wisdom: The 4-6 week establishment period is critical, but timing matters just as much. Water in the early morning to reduce evaporation and fungal risks. I always check soil moisture by hand—if the top 2 inches feel dry, it's time to water. Overwatering is just as damaging as underwatering, so resist the urge to water daily. Once established, boxwoods are remarkably drought-tolerant, but that first year sets the tone for their entire lifespan.
Pruning Precision: The 6-8 week waiting period before first pruning gives roots time to establish, but don't wait too long—delaying beyond 8 weeks can stress the plants. When shaping, always cut at a 45-degree angle just above a leaf bud. This technique encourages new growth and maintains the plant's natural shape. For formal hedges, I find that two light prunings (late spring and early summer) work better than one heavy pruning—it's less stressful for the plant and produces better results.
Pro Tips for Boxwood Foundation Planting
- A few strategic moves will ensure your boxwood border stays flawless for years—these are the secrets that separate a ...
- The Sunlight Secret: That 6 hours of sunlight requirement isn't just a suggestion—it's the foundation of healthy grow...
- Root Ball Revelation: When planting, the top of the root ball should be level with the surrounding soil—this is non-n...
Frequently asked questions
Got questions about creating a stunning boxwood foundation planting?
You’re not alone! Here are answers to the most common queries to help you design and maintain your low-maintenance, evergreen borders with confidence.
When is the best time to plant boxwoods along a foundation?
Plant boxwoods in early spring or early fall for optimal root establishment. Avoid extreme heat or frost—spring (after the last frost) gives roots time to grow before summer, while fall (6 weeks before frost) allows them to settle before winter. Pro tip: Water deeply after planting to reduce transplant shock!
How far from the foundation should boxwoods be planted?
Keep boxwoods 12–18 inches away from the house siding to prevent moisture buildup and potential rot. Space them 2–3 feet apart (center to center) for mature size, allowing airflow and easy maintenance. Troubleshooting: If your home has a slope, plant slightly uphill to divert water away.
Can I use alternatives to boxwood for foundation planting?
Consider holly, juniper, or dwarf yew for similar structure and evergreen appeal. Azaleas or camellias add color but may need more care. Design tip: Mix textures—pair boxwoods with ornamental grasses or low-growing perennials for year-round interest.
Why are my boxwoods turning brown or losing leaves?
Brown leaves often signal overwatering, underwatering, or fungal issues (like box blight). Check soil moisture—boxwoods prefer well-draining soil. Prune affected branches, improve airflow, and apply fungicide if needed. Prevention: Mulch 2–3 inches deep (keep it away from the stem) to retain moisture and regulate temperature.
How and when should I prune boxwood foundation plants?
Prune lightly in late spring or early summer to shape and encourage bushiness. Use sharp shears to make clean cuts just above a leaf bud. Avoid heavy pruning—boxwoods tolerate minimal trimming (no more than ⅓ of the plant at once). Never prune in fall or winter to prevent dieback.
Are boxwoods deer-resistant?
Boxwoods are moderately deer-resistant, but hungry deer may still browse them. Protect young plants with deer repellent or physical barriers (like fencing). Mature boxwoods are less appealing due to their tough leaves, but consider adding deer-proof plants like barberry or Russian sage nearby for extra defense.
Wrapping up and next steps
Creating a boxwood foundation planting is your ticket to timeless elegance and low-maintenance beauty! With the right spacing, soil prep, and pruning know-how, you’ll craft a structured border that enhances your home’s curb appeal for years. 🌿✨
Now that you’re armed with the essentials, take the next step—sketch your design, gather your tools, and get planting! Whether you’re a seasoned gardener or a beginner, your boxwood borders will reward you with year-round sophistication. Happy gardening!